Brand an Object Appear and Then Disappear on a PowerPoint Slide Using Entrance and Exit Animations
by Avantix Learning Team | Updated February 5, 2021
Applies to: Microsoft ® PowerPoint ® 2013, 2016, 2019 and 365 (Windows)
Y'all can combine entrance and exit animations in PowerPoint to brand an object appear and disappear on a slide during a slide show. This can occur automatically or on click. An object is typically a shape, image, text placeholder or text box.
Recommended commodity: How to Use Morph in PowerPoint to Design Engaging Presentations
Do you want to learn more about PowerPoint? Check out our virtual classroom or live classroom PowerPoint courses >
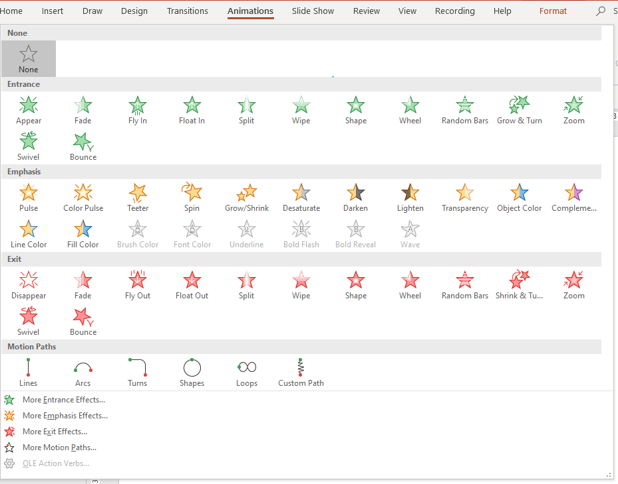
To apply animations, apply the Animations tab in the Ribbon:

The expanded Animations Gallery appears when you click the More down arrow in the Animations group:
If you want to apply more one animation to an object, you lot will need to utilise Add Animation in the Advanced Animation group.
Animations are typically added to objects in Normal View (but can be applied in Slide Master View).
In this article, nosotros are using animations to make objects appear and disappear. Check out the commodity How to Use Morph in PowerPoint to Design Engaging Presentations for other ways to make objects move on or off a slide during a slide prove using the Morph transition.
Adding an archway animation to make an object appear
To utilize an archway animation to an object to brand information technology appear on click:
- Select an object. For text objects, click in the text box or placeholder or click its edge.
- Click the Animations tab in the Ribbon.
- In the Animations group, click the More than down pointer on the bottom correct of the Animations Gallery.
- Click the Appear entrance animation in the Entrance grouping. Other mutual entrance effects are Fly In or Fade.
You tin can besides utilize an entrance animation by clicking Add Animation on the Animations tab in the Advanced Animation group.
By default, the object volition appear on click during a slide bear witness.
Adding an exit blitheness to make an object disappear
To apply an get out animation to an object to make it disappear on click:
- Select an object. For text objects, click in the text box or placeholder or click its edge.
- Click the Animations tab in the Ribbon.
- Click Add Animation in the Advanced Animations group (you lot must select Add Animation if you are calculation more ane animation to an object). A drop-down carte appears.
- Click the Disappear exit blitheness in the Leave group. Other common exit animations are Fly Out or Fade.
Displaying the Animation Pane
When y'all apply multiple animations to an object, it'due south best to brandish the Animation Pane so you can easily edit the animations.
To display the Blitheness Pane:
- Click the Animations tab in the Ribbon.
- Click Animation Pane in the Advanced Animations grouping. The Animation Pane appears on the right side of the screen.
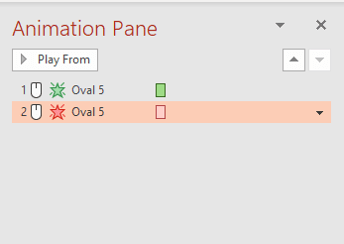
The Animation Pane will display the animations you have applied. If you take practical an entrance and exit effect, 2 animation effects will appear in the Blitheness Pane. You lot can click the blitheness outcome in the Animation Pane and click the arrow to the correct to display a drib-down menu with options or you lot can select options in the Ribbon for that effect.
In the Blitheness Pane, a green star appears beside entrance animations and a red star appears abreast exit animations as follows:
Changing the style an object starts
Animations are set by default to start on click during a slide show. If you want an animation to commencement automatically, you will need to change the start setting.
To get-go an blitheness automatically, y'all have two options:
- After Previous – the animation sequence volition begin one time a previous animation effect or furnishings is completed. The commencement of a slide show is also a previous event.
- With Previous – the animation sequence will begin at the aforementioned time as a previous animation consequence or furnishings. The kickoff of a slide show is also a previous event.
To modify the way an animation starts:
- Select the animation event in the Blitheness Pane.
- Click the Animations tab in the Ribbon.
- In the Timing group, select an option from the Start drop-down card.
Setting the speed or duration of an animation
When you apply an animation, a duration or speed is automatically prepare for the animation (in seconds). The default duration is different for each blitheness effect. The initial duration is often fast and you may want to increase the duration to slow it down.
To set a speed or duration of an blitheness:
- Select the animation effect in the Animation Pane.
- Click the Animations tab in the Ribbon.
- In the Animations group, enter a time (in seconds) for the animation in the Duration area of the Timing group. You tin click the upwards and down arrows to modify the duration or blazon a elapsing.
Notation the Duration in the example below:

Running a slide show
The last footstep is to run the slide evidence to see your object appear and disappear. Simply click the Slide Evidence button on the bottom right of the screen. Use the correct and left arrows to motion from slide to slide or kickoff the animations. You tin use many other methods to advance a presentation. Check out PowerPoint Slide Show Shortcuts (50+ Shortcuts) for other shortcuts you can utilize during a slide show.
Subscribe to get more manufactures like this one
Did yous notice this article helpful? If you would like to receive new articles, bring together our email list.
More resources
How to Plow Off Automatic Text Resizing in PowerPoint
How to Change Slide Size or Dimensions in PowerPoint
How to Group and Ungroup in PowerPoint (with Shortcuts)
How to Add Slide Numbers in PowerPoint (Complete Guide)
How to Remove the Background of an Paradigm in PowerPoint (2 Ways)
Related courses
Microsoft PowerPoint: Intermediate / Avant-garde
Microsoft PowerPoint: Blueprint for Non-Designers
Microsoft PowerPoint: Animations Bootcamp
Microsoft Excel: Intermediate / Avant-garde
VIEW MORE COURSES >
Our teacher-led courses are delivered in virtual classroom format or at our downtown Toronto location at one Yonge Street, Suite 1801 (Toronto Star Edifice), Toronto, Ontario, Canada (some in-person classroom courses may also be delivered at an alternate downtown Toronto location). Contact united states of america at info@avantixlearning.ca if you'd like to adjust custom onsite training or an online course on a date that's user-friendly for y'all.
Copyright 2022 Avantix ® Learning
Microsoft, the Microsoft logo, Microsoft Function and related Microsoft applications and logos are registered trademarks of Microsoft Corporation in Canada, US and other countries. All other trademarks are the property of the registered owners.
Avantix Learning | 1 Yonge Street, Suite 1801 (Toronto Star Building), Toronto, Ontario, Canada M5E 1W7 | info@avantixlearning.ca
DOWNLOAD HERE
How to Make a Powerpoint Slide in Gimp TUTORIAL
Posted by: theresaloortambel.blogspot.com


Comments
Post a Comment